Sunday, October 14, 2012

More Lights

I have been busy doing other things in recent weeks including a week end trip to Bundaberg and while there I checked out the local model rail group. The groups shed is located in the south east corner of the show grounds with access via Kensington St, and meets on Wednesday nights and Saturday afternoons. The club has two Ho scale layouts and two medium sized N scale layouts, sadly no N scale people were there during my visit.
I didn't manage to get any photos because I had Alisha with me and she was being difficult to say the least. If you do a web search you may find out some more but I don't think they have a web site. I also went to the Sydney model train show and was glad it wasn't the only reason for the trip because I would have been very upset if it was. It is a reflection of the Brisbane show and it's gradual decline. There were some positives but not many and it makes me question the future of shows but not the hobby.


Test fitting the valance made of 6mm MDF, I screwed it in place and filled the holes.

Before fitting the valance I painted the blind side with a coat of gloss white.
To make a better joint I trimmed back 3mm of each valance panel end so they will overlap
leaving only a small gap to fill and when painted you will not even see them.
I gave the MDF two coats of acrylic paint to seal it from moisture but I am not sure what
color the final coat will be.
With no cross supports to get in the way the lower deck lights were easy to mount.

The bottom level lights are almost finished and the top valance is up and painted.
After a Kato loco took a dive off the helix I decided to fix a barrier to prevent  it happening again.

This corner is the hold up at the moment I have to finish the helix before I can complete the bench work in front of it.

Tuesday, July 24, 2012

Let there be light

I have been placing the lights on the top deck of the layout and I am very happy with the result, for the price of two normal fluro lights I have been able to light about six meters of deck space.
With the light mounts put together I added the CF bulbs and used clamps to hold them in place to work out     the final positions.
For the price of two normal batten fluros I have managed to light about six meters of layout.

Front.
Back.

Just need to tidy up a bit.


Tuesday, July 10, 2012

More Benchwork

I have cut out some mounts for the lights from excess 12mm plywood and put them in a clamp to paint  all the edges  in one go.
With a bit of effort I managed to bend the 6mm MDF and screwed a block of wood to the deck to maintain the shape while the glue dried.


Test fitting the panels for the bottom level before painting them.


All the panels are glued and joints sanded, I am now painting the 3mm MDF panels (on the table)  for the roof of the top level, I will fir the lights before I fix down the ceiling.

Thursday, June 14, 2012

Top Deck

To save some time I painted the back wall with a undercoat to seal it.


First back drop in place.


Turd helping in her P.J's

Top deck is in place just needs painting.

Sunday, May 20, 2012

Helix Pt6

The junction for the staging yard at the top of the helix is in place and there is enough clearance for the tallest rolling stock.


I have also started the section around to the top level of the layout from the helix but will not complete it until the bench work for the rest of the layout is completed. So at this point the helix is about 95% complete.
I have started on the bench work on the layout again using 12mm ply for the decks and 7mm MDF for the staging yard. The decks will be ply due to the risk of the MDF absorbing water and swelling when the scenery is added. I was also playing around with the lights to test the gloss white paint on the bottom of the top deck.

The staging yard build is 95% complete I will finish it when the track is put down, I put down some track and tested the length of train I could put there. Twenty eight atlas coal wagons and two locos was the count which has made me consider bringing the staging around onto the layout proper to lengthen the trains, it always looks bigger on paper!


Tuesday, April 24, 2012

Helix Part 5

Second level is up and so are all the supports 


To get the spacing right I made a jig out of a block of wood to get the angle of the supports right.

I hold the brace in place with a clamp and drill the holes for the screws.

 I pushed the helix back in place to test that the levels are correct and make the top level junction to the staging yard.
 The support where the last section is going through is where the helix reaches the top level.


 Guess what some wanker put the support bench 65mm too low so I will have to put the helix on some blocks so the levels are ok.
The staging junction is made from 12mm ply and cut to allow trains on the helix to clear the top level and I used a router to cut a slot for the helix spiral.

Monday, March 26, 2012

Helix Part 4

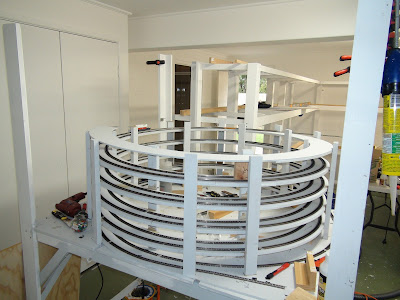
The photo below shows the helix base pulled away from the layout to provide all round access to build the helix and lay the track
 The two pieces that make up the helix road bed being laminated together, the track on the right leads from the top down to the lower deck and had to have enough clearance for tall rolling stock. The left side track is from the lower level up to the top deck.
 Once the first loop was finished I decided to start installing the supports for the rest of the decks, you can see the flat car with the tank on it to test the clearances because it is the widest piece of rolling stock I have.


 To save a bit of time and difficulty I paint the sections first before gluing them together, the construction usually goes in this order.
Paint some sections, then lay track on the last completed section on the helix then glue the next section.
 Like a nong I was hooking up a controller up to the track to test the alignment and joints with a loco, I saw a bloke on youtube testing his track with a 9V battery to run the loco, goes to show you learn something every day.
The time and effort to get the base right was worth it because all I have to do is place some spacer blocks to get the correct height for the next level.